Homemade Bagels

Homemade Bagels
Ingredients
1 1/2 tsp Sugar, divided
1 tsps Active dry yeast
1/2 Cup + 2 to 4 Tbsp Warm water, divided3/4 tsp Salt
2 Cups Bread flour (9.6 oz Gold Medal Better Than Bread Flour)
3/4 tsp Salt
1/2 Tbsp Vegetable oil

Combine 1/4 Cup of warm water (105°-110°F), 1/2 tsp sugar, and the yeast in a liquid measuring cup. Allow the mixture to sit for several minutes until the surface begins to foam. (Some would say that this step isn’t necessary if you’re using instant yeast, but I find that it can’t hurt and only takes a few extra seconds. I’d rather do this than get to the end and realize my yeast was bad when the dough doesn’t rise.)

While waiting for the yeast to proof, combine the flour, remaining sugar, salt, and vegetable oil. Add the yeast mixture, plus 1/4 Cup and two tablespoons of the warm water. The dough should feel stiff, but add the extra 2 tablespoons of water if the dough is really stiff or you can’t get all the dry flour incorporated.

Turn the dough down onto a lightly floured surface and knead for about ten minutes or until the dough is uniform and smooth.

Cut the dough into 4 equal sized balls, and let rest for 10-20 minutes. Yeast dough is happiest between 70 and 80 degrees. If your kitchen is too cool, turn on the oven for just 1-2 minutes and then let the dough rise in there. Do not forget to turn the oven back off before proofing your dough.

Preheat your oven to 425°F.

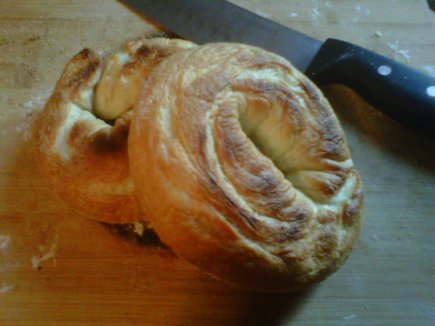
Take each dough ball and use two hands to roll it into a snake slightly longer than the width of both hands. When the snake is the proper length, wrap it around your dominant hand so the overlapping ends are together at your palm near the base of your fingers. Use your palm to squish the overlapping ends together. Once the dough is fused, slip it off of your hand and you should have a perfectly circular ring of dough. Try not to get discouraged if they aren’t shaped quite perfectly. It takes a bit of practice.

Let your bagels rest on the counter for about 20 minutes. Meanwhile, bring a pot of water to boil and grease a large baking tray lightly with vegetable oil.

After 20 minutes, your bagels should start to look puffy. Add as many as you can to your boiling water without crowding. Boil you bagels for about a minute on each side. Remove them from the water, allowing them to dry briefly, and place them on your oiled baking tray. Repeat until all the bagels are boiled.

Place the tray in the oven. Bake the bagels for 20 minutes, turning them over halfway through the cooking time.

Let them cool for at least 20 minutes before serving.

To create flavored bagels like sesame seed or onion, spread the seed or slice on a small dry plate. Place the boiled, dried bagels face down onto the plate to coat and then place them seed side up on the baking tray. Bake and flip as described above.

Adapted slightly from Homemade Bagel Recipe by John D Lee.

Bacon Wrapped Pickles

Bacon Wrapped Pickle
This may seem like an incredibly unlikely post for a blog that attempts some kind of health consciousness. However, I’ve had a rough couple of days and I needed something special. I was talking to a friend about wanting comfort foods including pickles and bacon. Somehow, we ended up joking about bacon wrapped pickles. The joke became an idea and the idea became a reality. The universal “they” does say that bacon makes everything better, right?

Here is the “health conscious part” (Notice how health conscious is in quotes? I’m completely rationalizing this unhealthy behavior, but it’s totally worth it for a bacon wrapped pickle!): Everything is made from scratch!

Ingredients
1 Dill pickle spear (recipe)
1 Slice bacon

Wrap the pickle with the slice of bacon, securing the bacon ends to the ends of the pickle with toothpicks if necessary.

Heat a pan over medium, add the bacon wrapped pickle, and fry on all sides until crispy.

Enjoy your bacon wrapped pickle. You’re welcome.

(P.S. I suspect this will become the next big thing at those southern fairs where fried food reigns. Move over Fried KoolAid; Bacon Wrapped Pickles are here!)

Spicy Garlic Dill Pickles (Refrigetator Method)

Almost Pickles

I’m way behind in my posts, and I feel horrible about it. I’ve been cooking up a storm, but haven’t had much time to assemble it all into useful blogging magic. I have a legitimate excuse, promise. I’ve been working nights in the Emergency Department of the local hospital to complete my Advanced EMT license. Saving lives is worth a little blogging delay, right???

Unfortunately, that means this pickle recipe is just a little bit out of season. A while back our CSA bag included both pickling cucumbers AND fresh dill in the same week! The obvious solution? Dill pickles! I searched far and wide for a decent recipe. I, personally, do not like sweet pickles. I won’t touch them. So many of the recipes I found suggested adding a small amount of sugar to the mix, but I don’t like even a hint of sweetness in my pickles so I was determined to avoid it. This recipe does the trick. When I finally cracked open the first jar, I ate the entire thing in about an hour. These are THAT good!

I strongly prefer to use fresh dill in my pickles, but I turn to dry dill in a pinch. This year, with the exception of the first batch, there was no fresh dill to be found at any of the grocery stores in town. It seems that lots of people around here pickle things and like their fresh dill. I made my second batch with dried dill, but that created its own unexpected problem. Dried dill floats and sticks to the pickles. I finally found the trick with the third batch…tea bags. I created my own little dried dill teabags and put them into the bottom of the jars with the rest of the spices.

Although some people boil their pickles in a water bath canner, I can survive without an apocalyptic supply of pickles so I stick to the refrigerator method. If you’d like to process yours to make them shelf stable, you can find instructions here.

Place your spices in the bottom of each jar.

Place your spices in the bottom of each jar.

Cut cucumbers and place into the jars. They should fit tightly but not be squashed.

Cut cucumbers and place into the jars. They should fit tightly but not be squashed.

After about 2 weeks, enjoy your pickles. The longer they sit, the better they taste!

After about 2 weeks, enjoy your pickles. The longer they sit, the better they taste!

Ingredients
2 pounds pickling cucumbers
1 1/2 cups distilled white vinegar
1 1/2 cups water
2 tablespoons pickling salt
6 garlic cloves, peeled (2 per jar)
3/4 teaspoon crushed red pepper per jar (1/4 teaspoon per jar)
6-12 sprigs fresh dill (2-4 per jar), or 2-3 tsp dried dill per jar
1 1/2 teaspoon black peppercorns per jar (1/2 tsp per jar)

Wash the cucumbers, remove the ends, and cut them into spears no larger than 1 inch shorter than the height of the jar.

In a medium saucepan, combine vinegar, water and salt. Bring to a simmer.

Arrange the jars on the counter and divide the spices between them. Pack the cucumber slices firmly into the jars, but not so tightly that they are bruised or damaged.

Pour the brine into the jar, leaving approximately ½ inch headspace.

Tap the jars gently on a table or counter to dislodge any trapped air bubbles.

Apply the lids and rings, and allow them to return to room temperature. When cool, place them in the refrigerator. Your pickles are ready to eat in about two weeks and will last up to six months in the refrigerator (if you can leave them alone that long

Adapted from Garlic Dill Refrigerator Pickles by Marisa Mcclellan.

Zucchini Bread (Grain, oil, and dairy free)

Zucchini Muffins
I grew up in the era of processed food, in a time when scientists and nutrition gurus told us that margarine and Snackwells cookies were healthy and that whole foods like beef and eggs were not. Much of my mother’s baking came from a boxed mix, but one thing that she always made from scratch was zucchini bread. I could eat that stuff for breakfast, lunch, and dinner. I enjoy other quick breads, but zucchini bread has always been my favorite. I suppose it reminds me of sitting on the counter, wooden spoon in hand, learning how to bake with my mother.

On Sunday, a coworker gave me two beautiful zucchini squash and my first thought was about zucchini bread. I may not be able to have wheat, but I can still have my zucchini bread. This time, I made muffins because I wanted something easy and portable.

Ingredients
Cooking spray
2 Cups Cooked chickpeas
2 Eggs
1/2 tsp Salt
1/2 tsp Baking soda
1/2 tsp Baking powder
1 tsp Cinnamon
1/2 tsp Nutmeg
1 Tbsp Unsweetened applesauce or full-fat yogurt
3/4 Cup Sugar
1 Cup Grated zucchini

Preheat oven to 350°F. Spray a muffin tin with cooking spray or line with cupcake papers and set aside.

In a food processor, process chickpeas and eggs until smooth. Add remaining ingredients except for zucchini and continue to process until fully blended. Fold in zucchini and pour into prepared muffin tin.

Bake until the muffins are a deep golden brown and a toothpick inserted in the middle comes out clean, about 40 minutes.
Cool in the tin on a cooling rack for 30 minutes, then remove from the pan and continue cooling on rack.

Pumpkin Chocolate Chip Cookies (grain, oil, and refined sugar free; vegan)

Pumpkin Chocolate Chip Cookies

My favorite season is Autumn. Even though it’s only August first, I’m already looking ahead to cooler weather, colorful leaves, and the tastes of spiced apple and pumpkin. The orchards are just starting to sell their summer apples, and I’m looking forward to the fall varieties that are barely a month away. I’ll be spending my fall days picking apples, making and canning applesauce and apple butter, and canning pumpkin for cookies and pies.

Autumn

While I wait longingly for apple and pumpkin season, I decided to pick up some canned pumpkin and create something fall-inspired. Boyfriend is kind of picky when it comes to my healthy cookies. He’ll never turn down a cookie, but he can usually tell that they contain something…non-traditional. These were not only well-received, he gave them 4 forks out of 5 (which he reserves for only the most spectacular of foods)!

Gratuitous gooey melted chocolate picture. You're welcome.

Gratuitous gooey melted chocolate picture. You’re welcome.

Ingredients
1 1/4 Cup Cooked chickpeas, well-rinsed
1/2 Cup + 2 Tbsp Pumpkin
1/4 Cup Honey or maple syrup
1 tsp Baking powder
a pinch of Cinnamon
a dash of Nutmeg
a pinch of Salt
1/2 Cup Semi-sweet chocolate chips**

Preheat the oven to 350°F.

Combine all ingredients, except chocolate chips, in a food processor and process until very smooth. Scrape the top and sides and process again until fully combined. With a rubber spatula, fold in the chocolate chips. Refrigerate the dough for 10-20 minutes until firm.

Form the dough into 1½” balls. Place balls of dough onto a Silpat or parchment paper lined cookie sheet. Press down with fingertips or the back of a wooden spoon to flatten (about 1/2 inch thick). Bake for about 15-18 minutes.

These cookies will not rise and will generally hold their round shape. They have a soft, slightly cake-like texture.

**These can be made vegan by using vegan chocolate chips.

Adapted from Peanut Butter Chocolate Chip Cookie Dough Bites.

Spiced Applesauce Muffins (grain, oil, dairy, and sugar free)

Spiced Applesauce Muffins

I’ve been doing a lot of non-traditional baking lately. I’m feeling pretty confident with my non-traditional cookies, but I was missing things like banana bread, applesauce cake, and crepes. I started researching paleo cooking and discovered that they have some ingenious recipes for muffins, including this one for Grain-free Banana Muffins. With a few tweaks and a bit of experimentation, I managed to recreate my favorite Spiced Applesauce Cake in a grain-free muffin form. Hopefully you’ll enjoy these as much as I did!

These can be made vegan with chia or flax eggs. They can also be made with other types of natural nut butter (no added sugar or oil), although I prefer cashew because it is mild and doesn’t compete with the apple flavor.

Ingredients
1 Cup Natural cashew or sun butter
3/4 Cup Apple butter or applesauce (strained in cheesecloth)
2 Eggs
1 tsp Vanilla
1 tsp Cinnamon
1/4 tsp Nutmeg
1/4 Cup Apple, finely chopped (optional)
1/2 tsp Baking soda
1 tsp Apple cider vinegar

Preheat oven to 400° F.

Place all ingredients into a food processor and blend until thoroughly combined. Pour batter into a greased mini-muffin tin.

Bake for 8 to 10 minutes. The muffins will rise during baking and will fall somewhat after they are removed from the oven; don’t worry, this is normal.

Oatmeal Chocolate Chip Cookies (Vegan; wheat, oil, and dairy free)

Oatmeal Chocolate Chip Cookies
I absolutely love to bake. I also love to eat the results. What I don’t love is the way most baked goods make me feel. Wheat brings on a major allergy attack reminiscent of the peak of pollen season and often starts an argument between my tummy and I. It is simply not worth it. When I first realized that I needed to cut out wheat, I thought that I would have to spend a ton of money and time learning to bake with exotic flours. I was beyond wrong.

My first clue that I was thinking about wheat-free baking in completely the wrong way was this recipe by Erin over at Texan Erin Baking. It didn’t contain flour of any kind and relied wholly on cooked chickpeas, a staple in my kitchen. Erin mentioned that she had tried an oatmeal variety, but they didn’t work at all. I kept researching and eventually came across this recipe on Carrots ‘n’ Cake. The recipe looked great, but I wasn’t thrilled with the ratio of oil and sugar to other ingredients.

Eventually, using the knowledge I gained from Erin’s cookie recipe and a few experimental variations, I came up with the recipe below. Thanks to both Tina and Erin for the inspiration!

Ingredients
1/2 Cup Cooked chickpeas, rinsed and drained
1/2 Cup Oat flour
1/2 Cup Rolled or quick oats
1/2 Cup Brown sugar (or 3 Tbsp maple syrup; if using maple syrup, reduce applesauce to 3 Tbsp)
1/2 Cup Unsweetened applesauce
2 tsp Vanilla extract
1/2 tsp Cinnamon
1/2 Cup Chocolate chips (or raisins)

Preheat the oven to 350°F.

Place all ingredients, except chocolate chips into a food processor and blend until combined. Fold in the chocolate chips. Scoop the dough by tablespoons onto a silpat or parchment paper lined cookie sheet. Flatten slightly with the back of a spoon.

Bake for 18 to 20 minutes. Allow to cool before serving. (I admit it…I can never wait. These are awesome straight from the oven!)

Peanut Butter Crunch Bars

Snack Time
In my quest for the perfect granola bar, I had a few failures. My first attempt for chewy peanut butter granola bars was a melty, gooey mess. However, they turned into a delicious, crunchy, peanut butter candy bar. I store these in the freezer for a sweet treat! Best of all, with only a little honey as a sweetener, these are almost healthy.

Ingredients
1/2 Cup Peanut butter
1/3 Cup Honey
1/4 Cup Coconut oil
1 Cup Oats
3/4 Cup Shredded coconut
1/2 Cup Rice crispies

Melt the peanut butter, honey, and coconut oil in a medium sauce pan until fully combined. Remove from the heat. Stir in the remaining ingredients. Press into a parchment lined 9×9-inch baking pan and refrigerate for two hours. Cut into 12 bars, individually wrap with parchment paper or plastic wrap and store in the refrigerator or freezer.

Spiced Apple Granola Bars

Granola Bars
I love granola in all of its forms. I could probably live on the stuff if given the opportunity. I’m sure you could understand my disappointment when I realized corn (in all of ITS forms) was one of the foods making me sick. Just about every granola product in the grocery store contains some form of corn syrup. Every time I picked up a box of granola bars for Boyfriend, I struggled with my desire to sneak just one. The occasional failure quickly reminded me that my body was not impressed with my lack of willpower. There was only one solution: figure out how to make my own.

My first attempt at granola bars was a complete failure, although what began as a granola bar failure turned out to be a candy bar success. (Peanut Butter Crunch Bars will be posted tomorrow!) The second attempt was far more fruitful. I mixed these up in just a few minutes, popped them into the oven while I got ready to go to the gym, and pulled them out right before I left. They were cooled and ready to cut when I got home…and I immediately ate 3! At least I worked out today. That balances out my granola bar indulgence, right?

See the notes below the recipe for alternative flavors.

Ingredients
1 Cup Apple butter*
1 1/2 Cup Rolled or quick oats
1/2 Cup Pecans, coarsely chopped
1/4 Cup Golden raisins

Preheat the oven to 375° F.

Combine all ingredients in a medium bowl. Line a 9×9 baking pan with parchment paper and lightly grease the bottom. Dump the mixture into the center of the pan; use a rubber spatula to firmly press the mixture into the pan. Bake for 35 minutes.

Allow to cool completely. Use the parchment paper to remove the granola from the pan. Cut into 12 bars. Store in an airtight container for up to 1 week.

*If you do not have apple butter on hand, substitute 1 Cup applesauce**, 2 Tbsp brown sugar, 1 tsp cinnamon, and 1/4 tsp nutmeg. Any other fruit butter (including pumpkin butter) may also be substituted.
**Canned pumpkin may be used in place of the applesauce if substituting.

This recipe was loosely adapted from Pumpkin Granola Bars on Girl Makes Food!

Farm Fresh: Swiss Chard Chips

Swiss Chard Chips

I’m a week behind on these Farm Fresh posts. Hopefully you’ll forgive me because we’re in the middle of moving and things are a bit chaotic around here. We got a ton of Swiss chard the first week of our CSA, and the second week brought more of the same. Although I love pesto, I already had 44 servings safely stored in my freezer, so I needed another way to use it all. I’ve been reading about kale chips for months, and I had a hunch that just about any leafy green (like Swiss chard) could be substituted successfully. As it turns out, my hunch was right on target!

Our week 2 CSA: summer squash, new potatoes, radishes, cilantro, garlic scapes, chives, Swiss chard, and lettuce.

Our week 2 CSA: summer squash, new potatoes, radishes, cilantro, garlic scapes, chives, Swiss chard, and lettuce.

I feel almost guilty for eating the whole pan in less than 10 minutes. Then I remembered that I wasn’t eating calorie laden potato chips. These little green chips are sinfully delicious and heavenly healthy. I like a bit of spice with my chips. Let me know in the comments how you like yours.

Ingredients
8-10 Swiss chard leaves
Nonstick cooking spray
1 Tbsp olive oil
1/2 tsp kosher or sea salt
1/4 tsp garlic powder
1/8 tsp chili powder
1/8 tsp smoked paprika

Preheat the oven to 275° F.

Thoroughly clean and dry the Swiss chard leaves. Trim the stems and cut into 2″ pieces.

Lightly spray a cookie sheet with nonstick cooking spray. Spread the leaves out on a cookie sheet and toss with olive oil to coat. Sprinkle with salt, garlic powder, chili powder, and paprika.

Bake for 20 minutes. Gently turn the leaves over and continue cooking for 20 more minutes until crisp. Allow them to cool for 10 minutes…if you can.